By Ajit Tiwari, Second Officer (Oil Tankers — Suezmax & VLCC)
Reviewed & Updated: July 2026
Checked against IAMSAR Manual Vol. III, 2025 edition
I sail as a Second Officer on crude oil tankers — Suezmaxes and VLCCs, between roughly 270 and 330 metres in length. At a service speed of 14 knots, a ship that size puts more than *432 metres between herself and a person in the water every minute. In open water, where a human head is little more than a football-sized target among the waves, visual contact can disappear fast — which is why the Williamson Turn is the first man-overboard manoeuvre we drill, and the one most navigating officers reach for the moment a casualty’s position is uncertain.
It earns that place by doing something no other recovery turn guarantees: it brings the ship back onto its own track, pointing the opposite way, so you can retrace the line the person fell from. It works in the dark. It works in fog. It works when the person was never seen going in, or when contact was lost after — which, on a merchant ship with a crew of only twenty-odd people, is often the more realistic scenario.
This guide explains the Williamson Turn from a working deck officer’s perspective: what to do in the first minutes, how to execute the manoeuvre, why the 60° trigger works, when to choose it over the Anderson or Scharnow turn (and where the newer Lorén turn fits), and the mistakes that most often appear in drills. It also includes a worked example and an exam quick-reference table.
What Is a Williamson Turn?
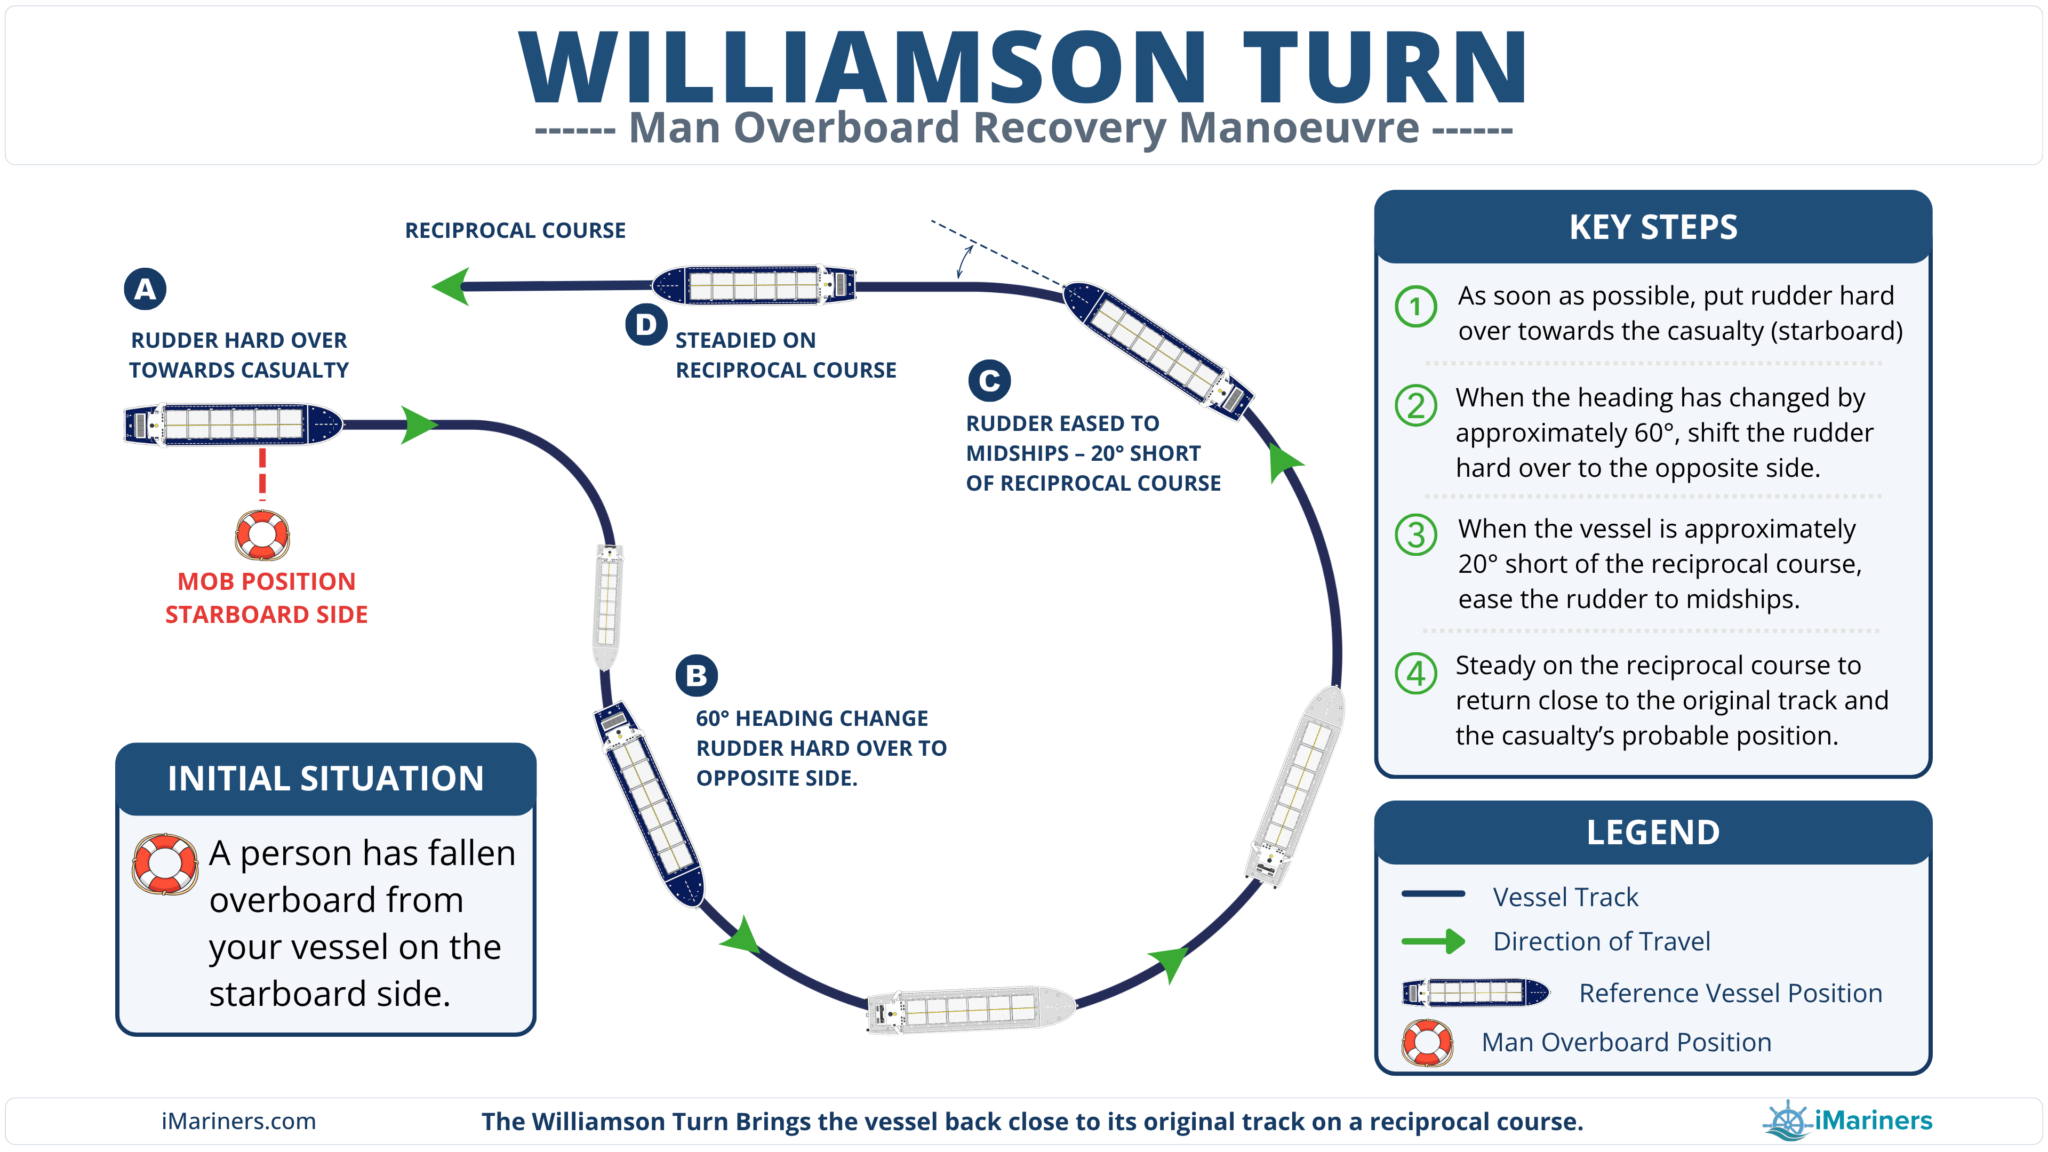
A Williamson Turn is a man-overboard recovery manoeuvre in which the rudder is put hard over towards the side the person fell, held until the ship’s heading has changed 60° from the original course, then shifted hard over to the opposite side. The ship comes around onto the reciprocal course and retraces its original track back to the casualty. It is the preferred turn at night, in restricted visibility, or when the person’s position is uncertain.
That ability to retrace the original track is what makes the Williamson Turn so valuable. The Anderson turn gets a ship back to the casualty faster when they remain in sight, while the Scharnow covers less distance when the casualty is known to be well astern. The Williamson’s advantage is different: it is designed to return the vessel to the line it came from, making it the preferred option when visibility is poor, visual contact has been lost, or nobody knows exactly when the person went overboard.
Why It’s Called the Williamson Turn
The manoeuvre is named after John A. Williamson, a U.S. Naval Reserve officer who developed it in 1943 while serving as an instructor in anti-submarine warfare and seamanship at the U.S. Navy’s Subchaser Training Center in Miami. He first applied it to recover a man who had fallen overboard, and the manoeuvre has carried his name ever since.
For deck officers and oral candidates, one detail is worth remembering: Williamson is sometimes described as a Lieutenant Commander or associated with the destroyer escort USS England, but both references relate to a later stage of his career, after he had already developed the turn as a training-centre instructor.
If an examiner asks who developed the Williamson Turn, “John A. Williamson, U.S. Naval Reserve, 1943” is the safest and most defensible answer. Ranks like “Captain” or “Vice Admiral,” sometimes seen attached to his name, aren’t supported by the record.
When to Use a Williamson Turn
Best-use situations
Reach for the Williamson when certainty is limited — whether because visibility is poor, the casualty’s position is uncertain, the time of the fall is unknown, or visual contact has been lost. In practice, these conditions often overlap.
- Visibility is reduced — night, fog, rain, heavy spray, or any condition where you may lose sight of the person.
- The position is uncertain — someone is discovered missing rather than seen falling. This is the realistic merchant-ship scenario: a crew member doesn’t appear for a meal or a watch handover, and you have no idea whether they went over ten minutes ago or two hours ago. The Williamson brings you back to the one reference you still trust: the ship’s own track. The search starts from there.
- The time of the fall is unknown — the turn is designed to bring the vessel back onto its original track, so you re-cross the line regardless of when the casualty entered the water.
- Visual contact has been lost — the manoeuvre never depends on keeping the person in sight.
- You want a repeatable method the whole watch team can execute — two cues (60°, then 20° short of the reciprocal) are easy to teach, easy to remember under stress, and deliver consistent results.
When Not to Use It
The Williamson is reliable, not fast. It is the wrong choice when:
- The person is in clear sight, seconds count, and the ship is nimble. The Anderson (single) turn gets you back sooner.
- A long time has passed and the casualty is far astern — well beyond your turning radius, with the elapsed time known. The Scharnow retraces the wake with less distance run.
- Sea room is restricted. The Williamson first takes the bow 60°-plus away from the track before looping back. In a narrow channel, a traffic separation scheme, or close to a hazard, that initial excursion may simply not be safe. If the water is not there, the practical option is to take way off the ship, launch the rescue boat when conditions permit, alert VTS and nearby traffic, and work from the datum rather than force a turn the channel cannot accommodate.
The trade-off is simple: the Williamson takes you farther from the scene before bringing you back. You gain certainty of track recovery at the cost of time and sea room.
The Williamson Turn Procedure (Step by Step)
The First Sixty Seconds
These actions happen almost simultaneously. The OOW drives several of them at once and does not wait for the Master to arrive:
- Wheel to hand steering, rudder hard over towards the side the person fell (“hard-a-starboard” for a starboard-side fall). This is the first move of the turn and a safety action in itself: it kicks the stern — and the propeller — away from the person during the most dangerous seconds of the entire event.
- Shout it and sound it. “Man overboard, starboard side.” Sound the MOB/general alarm and detail a dedicated lookout whose only job is to keep the person in sight and continuously point towards them.
- Press the MOB / event-mark button on the GPS and ECDIS. That datum becomes your reference if visual contact is lost — and on a large merchant ship, it frequently is. If your crew carry AIS MOB beacons or personal locator beacons (PLBs), detail someone to monitor for a transmission: an AIS MOB target tracks the casualty, not just the position where they entered the water.
- Release the lifebuoy fitted with self-igniting light and smoke on the side they fell. It provides immediate flotation assistance and marks the position with light and smoke.
- Engines to standby, so the engine room can respond immediately to manoeuvring requirements.
- Inform the Master.
- Note the time, course, and position, and continue logging all actions from this point onward.
Most company standing orders make the principle clear: in a man-overboard emergency, the OOW acts immediately on their own authority. The Master is informed, not consulted. At 14 knots, a large merchant ship opens the range on a person in the water by more than 400 metres every minute — the better part of four football pitches. That is why the first helm order cannot wait for permission, confirmation, or a second opinion.
Executing the Turn
With the rudder already hard over towards the casualty:
| Step | Helm Order / Action | Execution Cue |
|---|---|---|
| 1 | Rudder hard over to the side of the casualty | The instant of the report |
| 2 | Hold the turn, maintaining speed, until the heading has changed 60° from the original course | Heading = original ± 60° |
| 3 | Shift the rudder hard over to the opposite side | At 60° of deviation |
| 4 | When the heading is about 20° short of the reciprocal course, ease the rudder to midships | Heading ≈ reciprocal ∓ 20° |
| 5 | Steady on the reciprocal course (original ± 180°) | Now retracing the original track |
Maintain speed throughout the turn. Changing speed mid-turn changes the geometry, and the ship can come out steady on a course that is reciprocal but offset — parallel to the original track rather than on it. Then you’re running a careful, confident search down a line the person was never on. Slowing down belongs to the final approach, not the turn.
One precision often overlooked in textbooks — the Williamson Turn is designed to return the vessel to its track through the water, not necessarily its track over the ground. In a strong current, both ship and casualty are being set by the environment, but not necessarily in exactly the same way — the MOB datum on the ECDIS is a fixed geographical position, while the casualty begins drifting away from it the moment they enter the water. Current and leeway can open a real gap between the mark on the screen and the person in the water, which is why the lifebuoy, smoke float, visual bearings, and any AIS MOB transmission remain just as important as the electronic fix.
The Final Approach and Recovery
Once steady on the reciprocal and back on your track:
- Reduce speed in good time and keep the engine ready for manoeuvring.
- Position the ship to windward of the casualty so the hull creates a lee — an area of more sheltered water on the downwind side where recovery can take place more safely.
- Stop the engine with the person well forward of the propellers. Bring them alongside on the lee side and recover them using the method prescribed in your company’s SMS.
- Have recovery equipment ready before you arrive: rescue boat crewed and turned out, pilot ladder, scramble net, recovery device or rescue sling rigged as appropriate, heaving lines ready, and the recovery team fully briefed. If conditions are too severe to launch the rescue boat, be prepared to pass or float a buoyant appliance to the casualty using a secured line.
Every ship also carries a ship-specific plan for recovering persons from the water. SOLAS Chapter III, Regulation 17-1 requires one. Know where yours is kept and what it says before the day you need it.
Why 60 Degrees? The Logic in Plain Terms
Strip away the numbers and the idea is simple: you overshoot the turn one way, then reverse it, and the two arcs fold the ship back onto the very line it came up — now pointing the other way.
It works because of how a ship actually turns. A vessel entering a hard turn does not pivot on the spot; it continues moving forward along its original heading (advance) while sliding sideways away from its original track (transfer). Holding the first hard-over until the heading has swung 60° allows the transfer to carry the hull well clear of the original track. Shifting the rudder hard the other way then produces an opposing transfer during the much longer counter-swing — roughly 240° of heading change. The two lateral offsets largely cancel, bringing the ship back onto the original track as the heading approaches the reciprocal.
That is the whole trick, and it is why the Williamson works blind: you are not steering at a person you cannot see, you are steering back onto your own wake — and you know exactly where that is.
One caution: 60° is the standard figure, not a law of physics. On some large or unusually shaped hulls, sea-trial data places the trigger nearer 50–55°. A 2020 full-mission simulator study of the IAMSAR manoeuvres found the same thing across seven ship types — most of the hulls tested regained the original track more accurately with the rudder shifted at 50°, and several required the midships call well before the traditional 20°-short mark. Your wheelhouse manoeuvring poster, pilot card, and sea-trial data take precedence over any generic number, including the ones in this article.
What the Textbook Doesn’t Tell You: Doing This on a 330-Metre Tanker
The textbook procedure is the same on every ship. What changes is how that procedure behaves when the vessel beneath you is a 300-metre tanker. These are the practical lessons that emerge in drills and bridge-team discussions long after the five textbook steps have been memorised.
The scale is different. The tactical diameter of a *laden VLCC can approach a mile. That “quick” initial 60° swing takes the ship a long way off her track and consumes real sea room — which is why the restricted-waters caveat is not academic. Before you are deep sea, look at your manoeuvring poster and understand roughly how much water your ship needs to complete the turn; the answer often surprises cadets who have only seen the manoeuvre on a simulator screen.
It takes longer than you think. The turn itself runs for several minutes on a ship this size, and the run back down the track adds more. By the time you are steady on the reciprocal, you are usually navigating back to an ECDIS datum, a strobe, and a smoke float — not to a memory of where the splash was. That is the real reason the MOB button and lifebuoy matter as much as the helm order.
Laden and ballast are two different ships. The same hull answers the helm differently deep-loaded than in ballast — response time, windage, and turning circle all change. The manoeuvring poster shows both conditions for a reason. When you drill, note which condition your timings were taken in, because the other one will not match.
The changeover to hand steering is the most common first fumble. In drills, the classic failure is not the helm order — it is an officer calling “hard-a-starboard” at a wheel still in autopilot. Make the changeover a reflex that lives in the same breath as the helm order.
Brief the helmsman that the midships call comes fast. The counter-swing sweeps roughly 240° of heading, and after minutes of steady turning it is easy to relax — then the 20°-short mark arrives and passes while someone is watching the wrong repeater. Closed-loop orders and read-backs (“hard-a-port” — “hard-a-port… wheel is hard-a-port”) are not ceremony; under stress, wheels genuinely get put the wrong way.
Assume nothing got done. Another recurring drill finding is that the MOB button never gets pressed because everyone on the bridge assumed someone else did it. The same happens with the lifebuoy. Call each action out loud and get an answer back.
Worked Example: A Night MOB on Course 090°
Conditions: Dark but clear, steady on 090°, speed 14 knots. The starboard bridge-wing lookout reports a person overboard to starboard.
- “Hard-a-starboard.” Wheel to hand steering, helm hard over; the stern kicks away from the person. Simultaneously: lifebuoy away to starboard, MOB button pressed, alarm sounded, Master called, engines to standby.
- The ship swings to starboard. At heading 150° (090° + 60°), the order is “Hard-a-port.”
- The ship now swings back to port the long way, passing through headings such as 090°, 040°, 000°, and 320° before approaching the reciprocal course.
- At 290° — 20° short of the reciprocal — “Midships,” and she steadies.
- The ship settles on 270°, steaming back down her own track. Speed comes off, the rescue boat is turned out, and the ship takes up position to windward of the casualty so the engine can be stopped with the person well forward of the propellers.
Original course 090° → reciprocal 270°. The ship is now running back down the same track from which the casualty fell, which is the entire purpose of the Williamson Turn.
Reciprocal-Course Quick Reference (Exam & Drill Table)
The figures below assume the standard Williamson Turn: hard-over towards the casualty, opposite rudder at 60° of heading change, and midships about 20° short of the reciprocal. Treat these as the textbook baseline — your own ship’s wheelhouse manoeuvring poster, pilot card, or sea-trial data may call for a different trigger angle.
For a casualty on the starboard side (initial turn to starboard). Mirror the figures for a port-side fall.
| Original Course | Initial Helm Order | Opposite Helm Order At | Reciprocal Course | Midships At (~20° Short) |
|---|---|---|---|---|
| 000° | Hard-a-starboard | 060° | 180° | 200° |
| 045° | Hard-a-starboard | 105° | 225° | 245° |
| 090° | Hard-a-starboard | 150° | 270° | 290° |
| 135° | Hard-a-starboard | 195° | 315° | 335° |
| 180° | Hard-a-starboard | 240° | 000° | 020° |
| 225° | Hard-a-starboard | 285° | 045° | 065° |
| 270° | Hard-a-starboard | 330° | 090° | 110° |
| 315° | Hard-a-starboard | 015° | 135° | 155° |
Reciprocal in one line: Original course below 180° → add 180°. Original course 180° or above → subtract 180°.
Williamson vs Anderson vs Scharnow Turn
All three manoeuvres are designed to recover a person overboard. The difference is when you use them, how quickly they bring the ship back, and whether they return you to the original track.
| Feature | Williamson Turn | Anderson Turn (Single / Round Turn) | Scharnow Turn |
|---|---|---|---|
| Best for | Reduced visibility, night, uncertain position, lost visual contact | Casualty in sight; immediate action; nimble, powerful ship | Casualty well astern (beyond turning radius); elapsed time known |
| Returns to own track? | Yes — reciprocal course back on the original track | No — a direct, judged approach | Yes — returns to the original track ahead of the MOB position, reducing the distance run when the casualty is already far astern |
| Speed of return | Moderate (slower) | Fastest | Most economical when the casualty is far astern |
| First helm action | Hard over towards the casualty | Hard over towards the casualty | Hard over towards the casualty |
| Shift-helm cue | At 60° deviation | None — hold the turn | At ~240° deviation |
| Completion | Midships ~20° short of the reciprocal | Midships at ~250° deviation; stop with the casualty ~15° off the bow | Midships ~20° short of the reciprocal |
| Main limitation | Slower; needs sea room for the initial swing | Needs good visibility and fine judgement; easy to overshoot | Never for immediate action; useless if the elapsed time is unknown |
One-line decision guide:
- Can’t see them, or it’s dark or foggy? → Williamson.
- Right there, in sight, on a handy ship? → Anderson.
- Happened a while ago and they’re far astern? → Scharnow.
A Fourth Manoeuvre Now Appears in the Manual
The 2019 edition of the IAMSAR Manual added a fourth standard manoeuvre alongside these three: the Lorén turn.
It is not a return manoeuvre — you do not use it to get back to the casualty. Its purpose is on-scene recovery support: the ship circles the casualty area so that her wake and the interference of the wave patterns reduce the sea state inside the circle, making it easier and safer to launch, operate, and recover the rescue boat.
Like the Scharnow, it is never an immediate-action manoeuvre. One of the three turns above brings you back; the Lorén helps once you have arrived.
Advantages and Limitations of Williamson Turn
Advantages
- Returns the ship to her own track on a reciprocal course — you search the line the person actually fell on, not a parallel one.
- Works in any visibility, day or night, which is why it’s the default.
- Doesn’t require keeping the person in sight or knowing when they fell.
- Two simple, repeatable cues (60°; 20° short) that a watch team can execute reliably under pressure.
- The initial hard-over uses the stern kick to carry the propellers away from the person in the first, most dangerous seconds.
Limitations
- Slower than the Anderson turn — it takes the ship farther from the scene before bringing her back.
- Needs sea room for the initial off-track swing; poorly suited to narrow channels and restricted waters.
- Sensitive to speed changes during the turn — alter speed mid-manoeuvre and you can end up on an offset track.
- Real tracks vary with handling, trim, loading, wind, and current. The standard angles are a starting point; the vessel-specific figures on your wheelhouse poster are the finish.
Bridge-Team Actions During a Man Overboard (OOW Checklist)
A perfect turn still fails without a coordinated bridge. In the first minutes the OOW drives all of this in parallel:
- Steer — hand steering, helm hard over towards the casualty’s side.
- Mark — MOB / event button on GPS and ECDIS.
- Buoy — lifebuoy with light and smoke on the casualty’s side.
- Alarm — MOB/general alarm; internal broadcast “man overboard, port/starboard side — rescue boat crew stand by.”
- Lookout — one person whose only job is to watch and point. Losing visual contact is the single most common way a recovery goes wrong.
- Engines — ring standby.
- Master — call the Master to the bridge.
- Warn traffic and shore — by day, hoist flag Oscar; make the VHF/DSC broadcast — a PAN PAN urgency call to all stations with your position and a request for vessels in the vicinity to keep a sharp lookout, escalated to a MAYDAY distress alert if the situation becomes one of grave and imminent danger — and inform the nearest MRCC.
- Log — every action, with times.
Typical role allocation: the OOW orders the helm, marks, alarms, and starts the turn; the helmsman executes and reads back; dedicated lookouts hold the bearing; the Master takes or directs the conn and confirms the recovery method; the engine room stands by; the deck party musters, readies the rescue boat, and rigs the recovery gear; whoever holds communication coordinates with traffic and the MRCC and keeps the log.
Common Mistakes to Avoid
- Hesitating on the first helm order. Every minute of delay is another 400-plus metres between ship and person, and keeps the stern near them longer.
- Turning the wrong way. Helm away from the casualty’s side swings the stern — and the propeller — towards them. Always turn towards the side they fell.
- Ordering helm at an engaged autopilot. The changeover to hand steering has to be part of the same reflex as the first order.
- Not marking the position. No MOB datum means nothing to navigate back to once visual contact is gone — and it will be gone.
- No dedicated lookout, or a lookout who gets pulled into other jobs.
- Missing the cues. Shifting the rudder early or late off the 60° mark, or steadying late past the 20°-short mark, puts the ship on an offset track — a confident search down the wrong line.
- Changing speed during the turn, which corrupts the geometry the whole manoeuvre depends on.
- Coming in too fast on the final approach, overshooting, and having to go around — with the propellers now the hazard.
- Ignoring wind and current at the pickup, so the person drifts off the lee or under the flare of the hull.
Frequently Asked Questions
What is a Williamson Turn?
A Williamson Turn is a ship manoeuvre that returns a vessel to a point it has already passed — usually a person overboard. The ship turns hard towards the casualty’s side, swings 60° off course, then reverses the helm to come around onto the reciprocal course, retracing its original track back to the person.
How do you do a Williamson Turn?
Put the rudder hard over towards the side the person fell; at 60° of deviation from the original course, shift the rudder hard over to the opposite side; at about 20° short of the reciprocal course, ease to midships and steady on the reciprocal. Maintain speed through the turn and reduce only on the final approach.
When should you use a Williamson Turn?
In reduced visibility, at night, when the casualty’s position is uncertain, when visual contact has been lost, or when nobody knows exactly when the person went over. It returns the ship to its own track, making it the preferred manoeuvre when position is uncertain or visual contact has been lost.
What is the main advantage of a Williamson Turn?
It brings the ship back onto its own track on a reciprocal course, so the search runs along the line the person fell from — and it works even when the person cannot be seen.
Which is faster, the Williamson or the Anderson turn?
The Anderson (single) turn is faster and is the right choice when the casualty is in clear sight and the ship is manoeuvrable. The Williamson is slower because it first takes the ship farther from the scene, but it is the more reliable option in poor visibility.
What is the difference between the Scharnow and Williamson turns?
Both return the ship to its own wake on a reciprocal course. The Scharnow is used when the casualty is well astern, beyond the ship’s turning radius, and the elapsed time is known — it covers less distance in that case. It must never be used in an immediate-action situation.
Why is it called a Williamson Turn?
It is named after John A. Williamson, a U.S. Naval Reserve officer who developed the manoeuvre in 1943 while serving as an instructor at the U.S. Navy’s Subchaser Training Center in Miami and first used it to recover a man who had fallen overboard.
Why 60 Degrees?
The 60° initial swing allows the vessel’s transfer to carry her clear of the original track. Reversing the rudder then generates an opposing transfer that brings the ship back onto that track on the reciprocal heading. Some large hulls tune the trigger to 50–55° based on sea-trial data — the wheelhouse poster governs.
Can a Williamson Turn be used in restricted waters?
With caution. The turn first takes the ship away from her track before looping back, so it needs sea room. In narrow channels, traffic separation schemes, or near hazards, that initial excursion may not be safe and another approach may be needed.
How many standard recovery manoeuvres are there?
Four, since the 2019 edition of the IAMSAR Manual: the Williamson, Anderson (single), and Scharnow turns, which bring the ship back to the casualty, plus the Lorén turn — an on-scene manoeuvre in which the ship circles to calm the sea and ease the launch and recovery of the rescue boat. The first three are return manoeuvres; the Lorén is an on-scene support manoeuvre used after the ship has returned to the casualty area.
Is the Williamson Turn a regulatory requirement?
No single regulation names the Williamson Turn specifically. It is one of the standard recovery manoeuvres in the IAMSAR Manual, Volume III, and man-overboard recovery is drilled regularly under SOLAS — most companies build MOB drills into the Safety Management System (SMS) drill matrix, often quarterly. Separately, SOLAS Regulation III/17-1 requires every ship to carry ship-specific plans and procedures for recovering persons from the water.
Sources and Further Reading
- International Aeronautical and Maritime Search and Rescue (IAMSAR) Manual, Volume III – Mobile Facilities (IMO/ICAO, 2025 Edition). The primary reference for the standard recovery manoeuvres — the Williamson, Anderson, and Scharnow turns — together with the Lorén turn, added in 2019 as an on-scene manoeuvre for rescue-boat recovery, and the latest man-overboard and recovery-of-persons action cards.
- International Convention for the Safety of Life at Sea (SOLAS), Chapter III. Covers life-saving appliances, emergency drills, and Regulation III/17-1 on the recovery of persons from the water. See also IMO Circular MSC.1/Circ.1447 – Guidelines for the Development of Plans and Procedures for Recovery of Persons from the Water.
- ICS Bridge Procedures Guide (International Chamber of Shipping). Practical guidance on bridge-team management, watchkeeping, emergency response, and man-overboard procedures.
- IMO Standards for Ship Manoeuvrability (Resolution MSC.137(76)), together with the vessel’s Wheelhouse Poster, Pilot Card, and Manoeuvring Booklet, which provide the ship-specific turning and stopping characteristics that always take precedence over generic textbook figures.
- Kim, I., Chae, C. & Lee, S. (2020). Simulation Study of the IAMSAR Standard Recovery Maneuvers for the Improvement of Serviceability. Journal of Marine Science and Engineering, 8(6), 445. DOI: 10.3390/jmse8060445. A full-mission simulator study examining the performance of the standard IAMSAR recovery manoeuvres, including evidence that some ship types regain the original track more accurately with rudder-shift angles earlier than the textbook 60°. The paper also discusses the Lorén turn following its inclusion in the 2019 edition of the IAMSAR Manual.
Disclaimer: The manoeuvring figures in this article describe the standard textbook Williamson Turn. Always follow your vessel’s approved manoeuvring data, wheelhouse poster, pilot card, and company Safety Management System procedures.
Williamson turn Poster Download in A4 size (Password: iMariners) for onboard Ship Posters or training purposes. (a reference to iMariners.com is required if used on any blog or video streaming sites)
* (figures will differ for faster or finer-hulled vessels — check your own ship’s data).